Showing posts with label Tips. Show all posts

Monday, December 5, 2011

Growing A Family Tree, A Guide from Kroger

I recently purchased a box of Crispy Rice, a Kroger brand breakfast cereal. On the back of the box I was pleasantly surprised to find a brief, colorful guide on building a family tree and collecting family records.

Click on the photo to see a larger version.

Growing A Family Tree (click to enlarge)

Saturday, June 4, 2011

Connecting the Dots with Social Networking

The internet has certainly changed the way we research and share information about ourselves and our families. With hundreds of genealogical resources located online, how often do we consider social networking sites, like Facebook to be among those resources?

For me, it all started with a peculiar friend request and an invitation to join a Facebook group called “Pulsiphers Unite.” I did not know the man who had invited me, but he introduced himself with his lineage and we quickly found that we were both descendants of Zerah Pulsipher. I joined the group, and was able to exchange some info with others in the group, meeting more of my distant cousins.

As many groups do, the group began to go inactive, but I was soon added to a new group, called “Our Pulsipher Roots.” This group is still growing. Through this site I was able to see more pictures of my own ancestors and their families, as well as read about the efforts of other Pulsipher research that was going on.

By creating groups and “pages” on Facebook, anyone can help connect their family and learn more about the past. Both types of pages allow individuals to share images, links, and other postings, as well as ask questions and have other Facebook users respond.

With Facebook usership increasing among more the more mature members of our families, the odds that you will be able to find a gem by participating in family pages is increasing. But don’t overlook all of your cousins, second cousins and so on. They will likely have stories and photos that you do not. This is truly a family effort, and everyone should be welcome to participate.

Begin by creating a group or a page that people can “like.” In order to boost interest, you may consider adding a few photos or other items, of your own. Next, send it out to all of your relatives. You can do this by sharing the link on your own wall, by inviting people (if it’s a group) or by posting the link on the walls or in messages to different family members. Encourage them to share the page with others who may not be on your friend list, and encourage them to begin posting stories, links and images while participating in the comments area of different posts.

Remember, this should be fun and non-threatening. The goal is to come closer as a family and learn more about the past.

If you do not yet have a Facebook account, but would like to get one, visit:

http://www.facebook.com

You will need an e-mail address to register. Also, as you probably noticed, this is not a step by step guide on how to create a group or page on Facebook. If you are new to Facebook, it may take some time before you are able to navigate your way around (or if you are just slow in getting used to a new layout every few months, like me), however, take comfort in the fact that you probably know someone who can help you get started, and that by running an internet search of any Facebook related question will lead to answers.

Sunday, May 1, 2011

FindAGrave.com

The Find A Grave website was started in 1995 by Jim Tipton who wanted to create a website database in order to share his hobby of visiting famous graves with others. As the project grew, it came to include normal, non-famous people from around the world. Now it serves as an indispensable aid to genealogists and those looking to honor their ancestors and kin.

There are a number of things that Find A Grave can help you learn about, including:

1) Where the grave of a particular person is located.

2) When the person was born and when the person died.

3) Where the person was born and died.

4) Relatives of the person being researched.

5) Various life or death information, as found in an obituary or death certificate.

6) What the person looked like, through the posting of portraits on their page.

Searching for someone is easy. From http://www.findagrave.com select “Search 60 million grave records” or from within the pages of the site, select “Begin New Search” from the top of the menu on the left hand side of the page.

When searching be ready to try a variety of things, being as specific as possible to narrow down your results. Often, a name, birth OR death year and location will be enough when results are too many to look though. When it comes to people who went by multiple names, be sure to try fuller more formal versions of their name first, and then try Americanized, or shortened versions. Though you can utilize the check box to include a maiden name in the search (maiden names are always shown in italics), not all profiles and graves have the maiden names of women on them, so you may need to know their married name.

In searching, please remember that this is not a complete database of all people who have ever lived or been buried in the United States. While the site is constantly growing, it will likely not have detailed entries for everyone you are searching for. Thankfully, members can create and edit their own pages and even communicate with other members in order to share genealogical information and research.

In fact, one tool that I have used a few times lately is the “Request a Photo” tool. For instance, if you visit a page for a person and there is cemetery information listed, but no image of their grave, click on the “Request a Photo” button.

By clicking on this button, a notification will be sent to designated grave photographing volunteers within a certain distance of the cemetery in which the requested person is buried. When someone posts an image to fulfill your request, you will be notified and you may visit the person’s page to see the new image.

Becoming a photo volunteer is easy and you will only take the requests that you have time for. To sign up to do this, create an account and select the check box that says “I would like to be a photo volunteer.” You can always go back to your profile, and select “Edit My Profile” to select or de-select this option later.

I was very glad to have found this website and hope to continue to contribute more as I begin to travel and research even more. This is a very simple and straightforward website that is worth your time, especially if you are researching people who died in the United States (other countries are not well represented as of yet).

Wednesday, December 22, 2010

Bringing Genealogy to Life for Children

Children have a natural interest and pride in their family and where they came from. This can be used to the advantage of parents who want to instill an early knowledge of family history work into their children. Here are a few activities that can help children learn about and become even more interested in their families.

1. Fill in a pedigree chart.

It’s really simple, but for children that know how to write, it can be a good introduction to such a useful tool. Encourage them to fill in the information that they know and ask questions about what they do not know, with the goal of filling in a four or five generation chart.


2. Create a family picture book.

This can mean a wide variety of things. My great aunt made activity/coloring books about some of our ancestors, but books that feature a photo of a family member or ancestor on each page coupled with their birth and death date or a simplified story about them can be easy to put together and easy for children to look through at home or even at church (like a quiet book).


3. Create a family chain.

This is a great hands on activity. Cut out slips of paper as you would to make a countdown chain. Using one slip of a special color, have the child (or a parent) write their name and birthday on the slip of paper and glue the ends to make a ring. Next on a different slip of paper write the mother’s name and birthday and on another slip do the same for the father. Put the mother’s slip of paper through the child’s ring and glue the ends to make another link. Do the same with the father’s slip of paper, connecting it to the child only, not the mother. One more slips of paper, write down grandparents, great grandparents and anyone that the child is DIRECTLY descended from. Connect these slips to the mother’s and father’s link (paternal grandparents to the father only, maternal to the mother only), continuing on. This helps children visualize how they serve as a link for their family members, and how they are linked to their ancestors. It is also a fun craft.


4. Act out stories.

Have children act out notable stories about their ancestors. Use costumes if possible and allow children to use their own words to express the story. If they tell a part incorrectly, do not worry. They will learn it better with future retellings by you, their parent. This is about letting them tell the story as they understand it. One great addition: COSTUMES!


5. Encourage journal writing.

Finally, make sure your kids know how important it is for them to record their own history. Set aside family time to have a brief journal writing session. For children that do not yet write, have them draw a few pictures and then ask them to explain the pictures while you transcribe each explanation near the picture.

Saturday, December 11, 2010

Family Search Compatibility for RootsMagic

RootsMagic is a program that will allow you to create family trees and store genealogical and historical information about those in your tree. For members of the Church of Jesus Christ of Latter-day Saints, RootsMagic offers other important features, full compatibility with Family Search and Temple Ready databases. In this tutorial, I will provide a brief overview of how to use Family Search through RootsMagic.


1) Create a Family Search account.

To do this, visit http://new.famulysearch.org and register for a new account. If you have an LDS account (such as one that you use for indexing) you will not need to create a new account but may skip this step. For anyone without an account, be sure to have your church membership number handy, as you will need it to sign up. If you do not know your number, contact your bishop and he will be able to give it to you.


2) Enable Family Search and LDS support.

When you create a new file in RootsMagic, a window like this will appear:

For this tutorial, we are interested in the check boxes to the right of the date and number formats. In order to use Temple Ready and Family Search from within your, check the boxes for “LDS Support” and “New Family Search.” If you have already created your file without enabling these options go to:

Tools > File Options > General and select LDS Support Boxes, then FamilySearch and select “Enable FamilySearch support” box.


3) Connect individuals to Family Search.

This is the hardest part, connecting the names to their counterparts in the internet database. To understand why this is, you must know that the database was created to reduce the amount of duplicate temple work that was being done. Knowing this, it is likely that you will have to combine several versions of the same person in order to see all of the temple work that has been completed, or to obtain all of the submitted information for the individual. But to start out, choose an individual (preferably further back in time to start, unless you have a lot of LDS relatives) and click on the grey tree symbol.

Here, you will be prompted to write your username and password into a pop-up box (you will have to do this once each time you start the RootsMagic up). Then the screen will look something like this:

In this case, there is only one suggested match and he matches my individual perfectly. If this is the case, check the box in front of the individual’s name and then click on the “Match with FamilySearch” button.

Note: If matches are close, meaning parents and spouse are generally the same with some spelling or minor differences, or if the birth and death date are within several years of your individual, it may really be the same person. Consider each mach carefully and use the magnifying class in front of the name to see more details about the individual as well as a comparison to your individual.


4) Gather information.

FamilySearch can contain a wealth of information for some individuals. After you have connected the individual to Family Search you can do one of two things, move from the “Find Matches” tab to the “Share Data” tab, or close the “Family Search Person Tools” window and then click on the now, blue tree after the individual’s name. They bring you to this screen:

Here, you can look over the information. The things listed on the left pane are what is already contained in your database. On the right is information from the Family Search website. Check boxes will appear next to anything that is missing or different from each profile, allowing you to add your information to Family Search or take information from Family Search and add it to your file. You will notice that LDS ordinance information is also available on this window for you to copy into your files. This and the “Ordinance” tab allow you to see what work has been done for the individual.

Another option on this window is to connect other individuals to their Family Search profiles (click on the grey trees on the right pane to match them with their counterparts on the left), or add individuals to your file (or from your file to Family Search) but clicking on the grey or blue tree symbols.


That is a basic rundown of how to use Family Search via your RootsMagic file. Just be sure to always be smart about who you are combining. It is not a disaster if you have found that the wrong person had been matched, just use the blue trees to undo the action, and all will be well. Also, before you add an individual to Family Search try to be sure that they REALLY are not in the system. Even if it means waiting until you get a little more information about them.

Monday, September 27, 2010

How to Use Personal Ancestral File

Personal Ancestral File (or PAF for short) is a family tree and genealogy program that is downloaded from the internet for use on a personal computer. It was developed by the Church of Jesus Christ of Latter-day Saints for use with their Family Search program and while it no longer has individuals adding to the online resources that the program pulled from, it can still be used as a personal database of information.

Perhaps you already use online family tree websites like Ancestry or New Family Search, this program might still be a good option for you if you want to have hard copies or your data and sources or if you are focusing on different families.

Step 1) Getting Started

Go to: http://www.familysearch.org
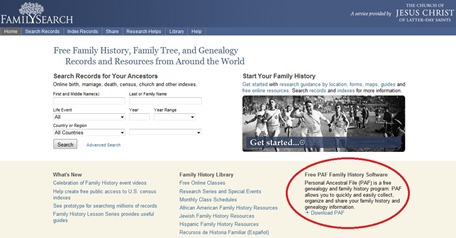
On this page, you will see a paragraph directing you to a page where you can download the free PAF software. Follow the link.

On this page, you will be prompted to enter your name and e-mail address.

On the next page is where you can determine what you would like to download. For people who want to use the program in English, the options are simple. English user will want to download PAF v.5.2 (make sure it is the English version). Additionally, they may also download tutorials on how to use the program and the basic version of PAF Companion v.5.4 (an additional program used for printing higher quality trees than can be printed from PAF).

The downloading process is the same as it is for any basic download. Simply follow the directions that appear on screen with each step.

2) Basic Use

PAF is a program built with the amateur genealogist in mind. Figuring out how to enter information becomes easy once the user has had a little bit of time to become familiar with the controls.

For a basic introduction, lets move from left to right on the PAF toolbar. The icons that are currently grey become colorful as individuals and families are added to the program.

First, the folder with the arrow indicates that you would like to open a PAF file onto the screen. Different files can be created to suit different needs, meaning that everyone does not need to be connected into one tree if research does not permit.

Second, the arrow pointing toward the disk indicates that you would like to import a GEDCOM (.ged) file. These files can be created in other genealogy programs or downloaded from the internet. They are the type of file used to store nearly all genealogical information in the computer world. Importing the file means that the individuals from the GEDCOM will be added to your program along with most marriage and family connection information.

The arrow pointing away from the disk indicates that you would like to export a GEDCOM. Selecting this button will open a window that will ask you exactly what type of file you would like to create and what you would like to include in that file. Instances when you may want to export information would include transferring it to another program, uploading it to the internet, burning it to a disk or saving it as a backup.

The box in front of a file window will guide you through instructions from which you would have at one time been able to use the TempleReady program for members of the Church of Jesus Christ of Latter-day Saints. This box will show up for people who have turned on the option to see ordinance information, however the feature is out of date and will not function correctly.

The printer indicates that you would like the print something.

The person with a pencil indicates that you want to edit the selected individual. Selecting this will open the same window that double clicking on the person (in any view) produces.

The notepad will allow you to edit the notes for the selected individual. This feature is also accessible using the same icon on the pop-up window used to edit the individual.

The camera will open a widow where the user may add or edit multimedia relating to the highlighted person. This can include adding pictures that are saved on the users computer.

The person with the plus sign will open a widow where the user may add a new individual and likewise the family with a plus sign allows the user to add information for an entire family.

The three buttons with binoculars allow the user to search using different elements recorded in the information. Individuals within the program may be searched alphabetically, by identification number (RIN), or by descendancy.

The person with the arrow is as way to instantly jump back to your “home” person. Generally, this will be the first person you enter into the program, but to change it go to Tools > Preferences > File and change the RIN of the home person (or search for them using the search button).

The icon of two people behind another opaque person indicates that the user would like to merge two record. This is necessary when information is downloaded or otherwise imported from an outside source. This allows the user to combine the record of two individuals (made sure they are the same person first!) in order to add more information to their family tree or minimize the number or repeat persons in their program. It is best to use this feature to keep your program clean of repeats from the beginning so as not to let it get out of hand.

The temple icon will take you to the missionary website for the Church of Jesus Christ of Latter-day Saints, Mormon.org.

The question mark will open a help window.

You may also need to use Tools > Preferences > File to adjust a variety of other settings, including whether you want Latter-day Saint ordinance information to show, the format of names and dates, and much more.

3) Finding Your Family

For here, learning to use the program should be easy. If you are starting out with little to no information, begin by entering yourself as the root person and moving from there. Add your parents, your siblings, any additional marriages of your parents and your own spouse and children if applicable. Continue on to add grandparents, aunts and uncles as far back and as detailed as possible. You may need to contact various family members for anniversaries and birthdates, but doing a little at a time will allow you to progress rapidly.

The further back you can gather information for, the more likely you are to be able to start matching it with information found in family history centers or on the internet.

PAF has a search feature built right into it. To use it:

  • Make sure the person in question is highlighted (do this by clicking on them).
  • Select Search > On FamilySearch Internet .

This will take you to the Family Search website where number of extracted and family information are provided. Here you may find family trees and ordinance records as well as birth, census, marriage, death and immigration information. To find the correct person you may need to refine the search, but keep in mind that others who have researched the same person may have entered slightly different spellings of names or dates for certain events for the exact same person. Use you best judgment when gathering information online.

From this website you may download GEDCOMs that can be imported into your program and merged with individuals in your files. If you find a family tree for someone, download their GEDCOM, import into PAF and merge the home person of the GEDCOM with their match in your program. The rest of the downloaded family will show up automatically by doing this.


That this is enough information to get anyone started that would like to give this program a try. It really is very simple and straightforward to use efficiently within a short period of time, especially for a tech-savvy person.

Wednesday, September 22, 2010

Patriarchal Blessings

For members of the Church of Jesus Christ of Latter-day Saints, patriarchal blessings are essentially a gift from the Lord for being righteous people who keep the covenants they have made. For the living, they provide guidance, but what happens to these precious documents when their recipients have moved onto the next world? While it is possible that a spouse or child may end up with a copy of the blessing in their possession, it will most likely become lost or damaged over time, if proper care is not taken to protect it.

If you are a member of the Church of Jesus Christ of Latter-day Saints and are a direct descendant (child, grandchild, great-grandchild, etcetera) of someone who obtained a patriarchal blessing, who is now deceased, you can order a copy of it from the Church Archives. You can do this by following the directions provided at the link below:

http://lds.org/churchhistory/archives/pbinfo

Requesting the blessings via email still provides you with paper copies that will come through the mail, but also allows for conversations between requesters and representatives in case more information or clarification is needed.

Patriarchal blessings can be an important if not essential part of a Book of Remembrance. They testify to the faithfulness of ancestors and provide descendants with meaningful insight into the lives of their predecessors. For those who are working on compiling the spiritual experiences of ancestors, obtaining patriarchal blessings can become an important part of that process.